
Whole-home renovation planning
Planning a Whole-Home Renovation in Los Angeles: What to Decide Before Demolition
Before demolition begins, agree on what the renovation will change, what it will preserve, and how the team will handle what it cannot yet see. Connect each open decision to the work that depends on it.
A whole-home renovation brings many separate choices into the same house. Moving the kitchen affects more than cabinets. Opening a living room affects more than the wall being removed. Replacing flooring raises questions about retained doors, adjacent rooms and the order in which spaces become available again.
The useful starting point is a written readiness review. It should identify the agreed scope, required permissions, planned investigations, living arrangements, material dependencies and process for authorizing changes. Some decisions belong before demolition; others can wait until a specific later milestone. Hidden conditions need an investigation plan and a stopping point for affected work.
This guide focuses on owner decisions for a substantial, contractor-led renovation. Use it with your designer and contractor to turn a collection of ideas into coordinated instructions. The examples and worksheets are planning aids; the project team and responsible agencies determine the technical requirements and permissions for your property.

Sort open decisions by the work they affect
A finish can look like a minor choice while controlling an important construction detail. A wall-mounted faucet, for example, needs coordination before its connections are concealed. Conversely, a paint color may remain open while the team completes unrelated preparation. The relevant question is: what happens next if this choice is still unresolved?
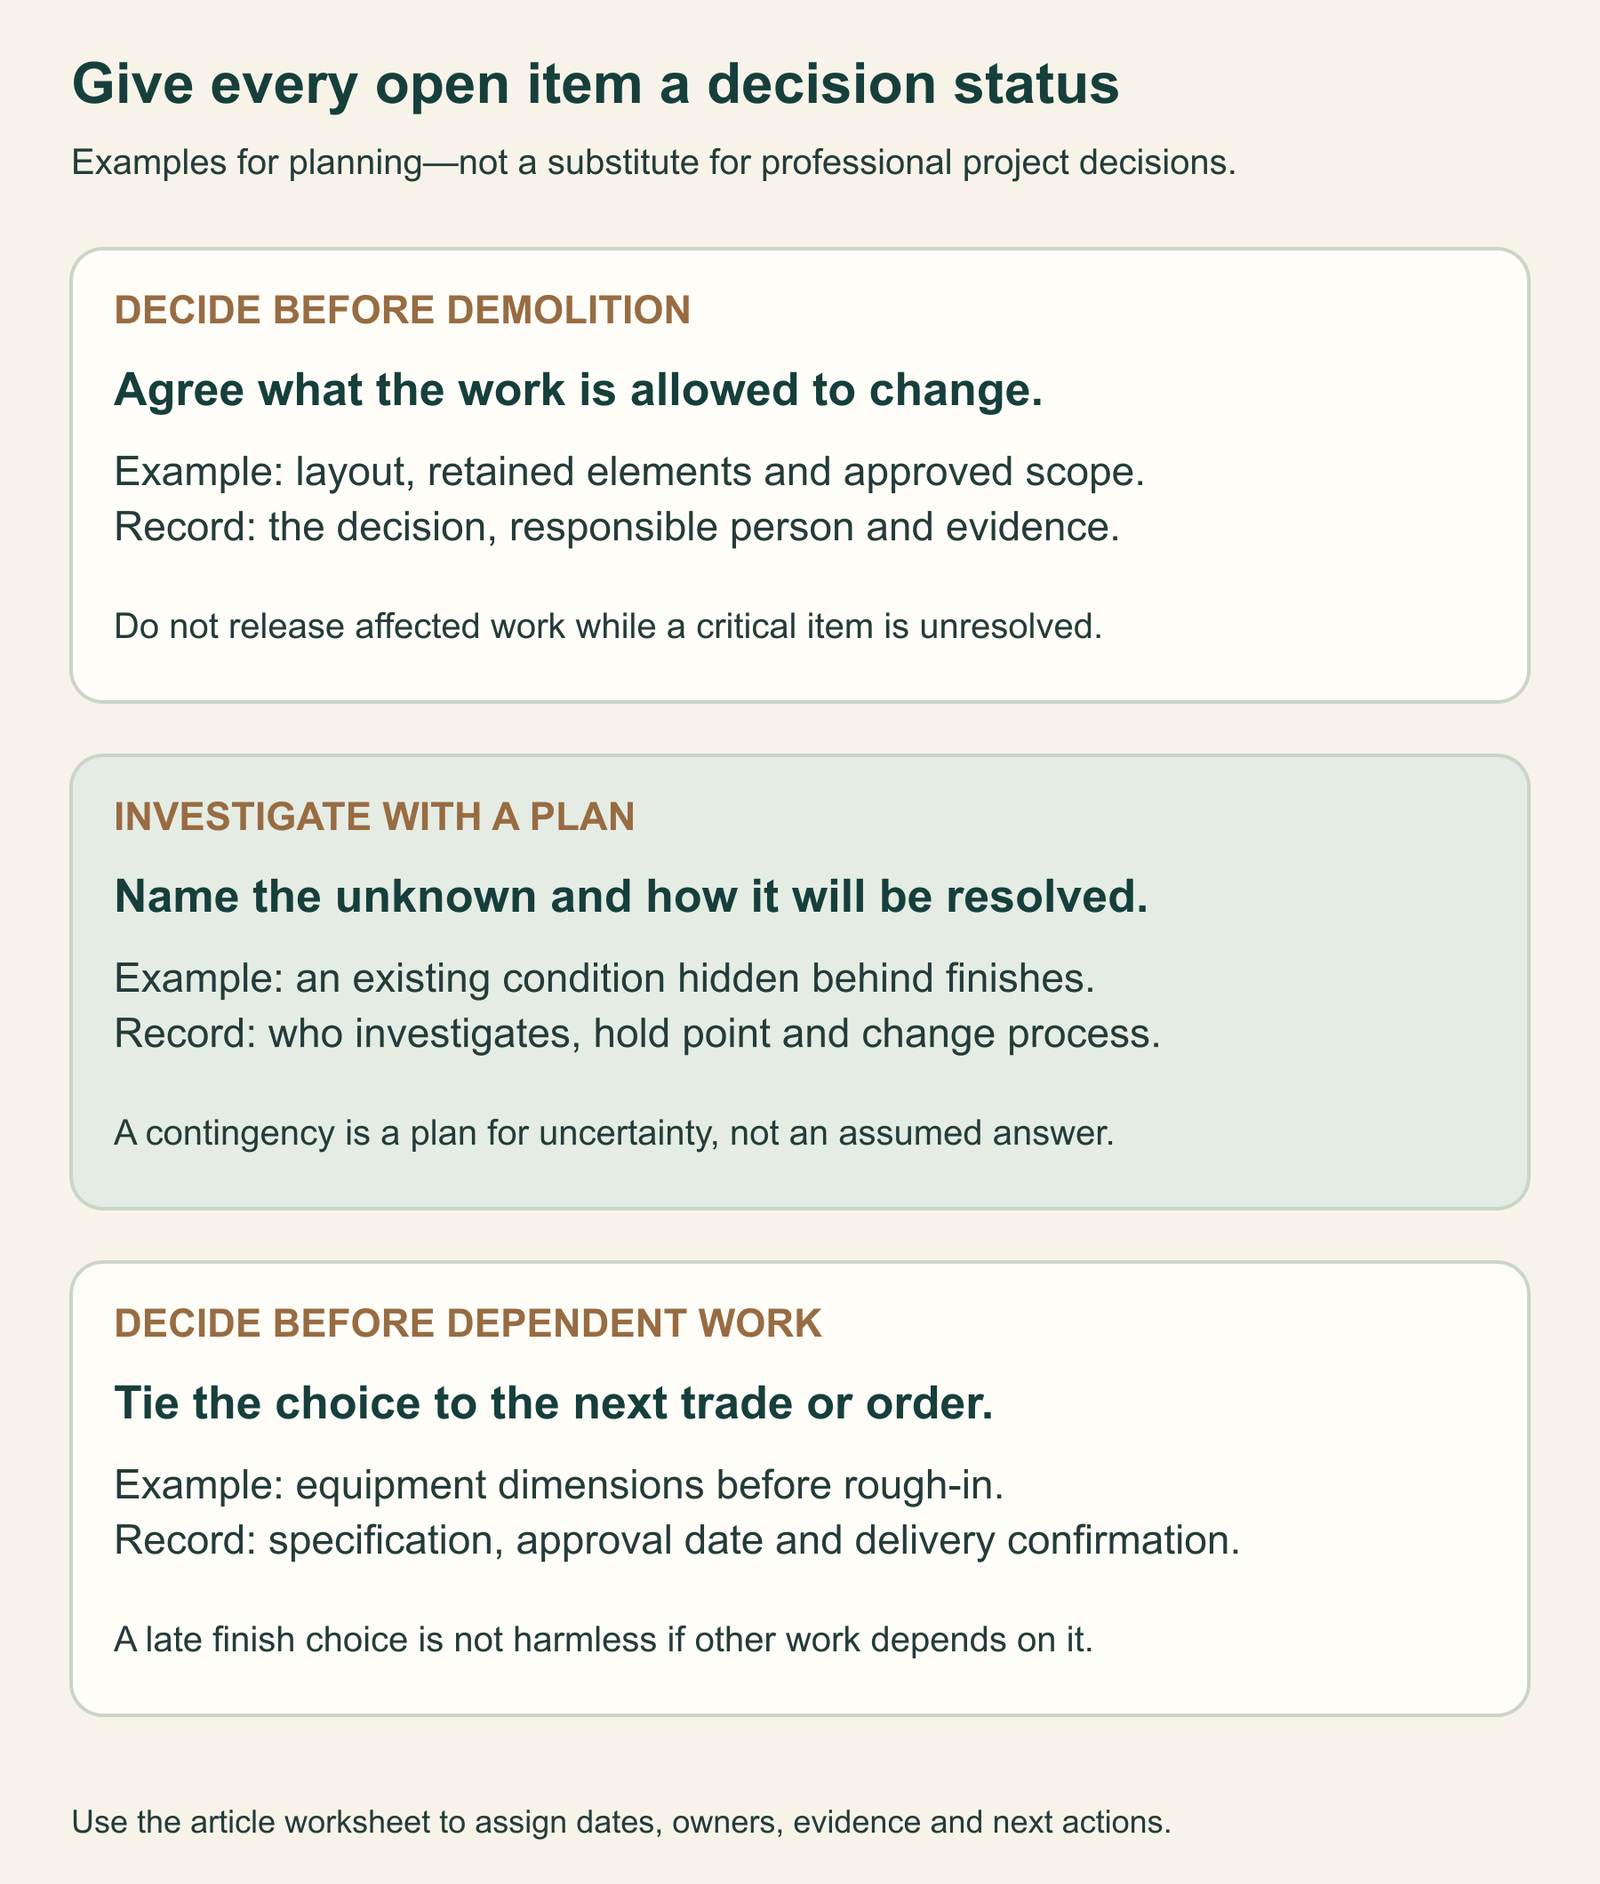
Give each open item one of three decision categories:
- Decide before demolition. Settle the layout being built, elements being retained, permitted scope, site protection and responsibilities for starting work. An unresolved critical item should hold the affected work.
- Investigate with a plan. Identify a concealed condition, the qualified person who will assess it, the authorized investigation and the point at which work pauses for a decision.
- Decide before dependent work. Put a deadline against a specific order, installation or trade activity. Record what information that decision needs and who approves it.
Keep these categories separate from progress status. “Investigate with a plan” describes how an item will be resolved; “needs investigation” describes its current state. This distinction helps prevent a known unknown from disappearing into a general list of unfinished tasks.
For a hypothetical kitchen renovation, the owner might settle the island location before demolition, authorize a planned investigation of a concealed service route, and schedule the cabinet hardware decision before fabrication. The team should identify whether the hardware choice affects preparation. “Later” becomes useful only when it has a deadline and a dependency.
Write a room-by-room scope the whole team can use
Start with how the house should function. Describe where daily routines break down: an awkward kitchen path, insufficient storage, a bathroom that does not serve the household, or rooms that cannot comfortably accommodate their intended use. Then identify the proposed physical changes. This gives the designer something more useful than a folder of attractive rooms.
For each space, record four things: the desired outcome, what stays, what changes and what remains uncertain. “Renovate the living room” leaves nearly everything open. “Keep the fireplace and exterior doors, replace flooring, revise lighting and investigate the proposed kitchen opening” is a starting point the team can discuss and price against drawings.
Use the same retain, remove, replace and investigate labels on the room schedule and relevant plans. Include less visible boundaries: whether closets receive the new flooring, whether trim continues into a hallway, and whether adjoining surfaces are refinished or only repaired. Ask each bidder to identify exclusions and assumptions against that shared scope.
Preservation deserves its own instructions. Photograph retained items and discuss how they will be protected, who can move them and where salvaged pieces will be stored. If a door or cabinet may be reused, ask the contractor to assess the practicality before relying on its reuse in the design. Do not leave the removal crew to interpret a sentimental or costly item’s significance.
Rank optional improvements separately from the work required to deliver the main outcome. This gives budget discussions a useful order. A lower-priority finish can be considered on its own merits, while a layout or system decision may affect several other parts of the project.
When comparing proposals, make a separate page for differences rather than comparing only the totals. List any missing room, owner-supplied product, provisional amount or unresolved investigation. Ask each contractor to explain how the proposal treats those items. Two totals cannot tell you whether both proposals include the same preparation, finish boundaries and disposal responsibilities.
For example, one hypothetical flooring proposal might include only the principal rooms, while another includes closets and adjoining trim work. Ask for the scope difference to be identified before deciding whether either proposal fits your plan. This avoids turning an incomplete comparison into a negotiation over a number whose contents remain unclear.
Before signing, reconcile the scope, drawings and proposal. CSLB’s home-improvement contract guidance calls for detailed work and product descriptions, a written payment schedule, permit responsibility and a completion date. A room schedule helps organize the conversation but does not replace a complete contract.
Investigate the existing house before committing to removals
Assemble available plans, permit records, inspection reports and documents from previous work. Add observations such as recurring leaks, rooms that heat unevenly, or an area where finishes have repeatedly cracked. Describe what you have observed without deciding the technical cause yourself.
For a property in the City of Los Angeles, City Planning’s zoning search guidance explains how ZIMAS helps with parcel information, overlays and related records. Records help establish questions for the team; they do not prove the condition of concealed work or approve a proposed renovation.
Ask the designer and contractor to separate three kinds of knowledge: conditions they have observed, assumptions used in the proposal, and conditions that need further investigation. Request a plan for accessing the latter when appropriate. Authorized exploratory work may need its own precautions and permissions; it should not become casual owner demolition.
Keep lead and asbestos planning distinct
EPA’s Renovation, Repair and Painting requirements generally cover paid work disturbing paint in covered pre-1978 housing, with exceptions. Covered firms need RRP certification and applicable lead-safe practices; a general contractor license alone does not establish that certification. The construction year does not prove that a particular painted surface contains lead. EPA also does not universally require paint testing before renovation; qualifying documentation and the proposed work determine how the rule applies. Discuss the approach with appropriately qualified professionals. See EPA’s contractor guidance.
Asbestos has a separate framework. For covered work, South Coast AQMD’s survey guidance distinguishes a renovation survey of affected materials from the broader survey required for building demolition. Have the appropriate certified professional establish the survey scope before disturbance.
The word “demo” on a schedule does not settle the regulatory classification. Under Rule 1403, removing load-supporting members can count as demolition; asbestos-free non-load-bearing renovation is treated differently. Required demolition notification can apply even when no asbestos is present. Have the contractor verify the classification, applicable notice and timing rather than applying one notice period to every remodel. South Coast AQMD explains these distinctions in its Rule 1403 FAQ.
Record the resulting reports, decisions and responsibilities in the readiness review. A generic “hazardous materials included” note is difficult to evaluate; identify what was assessed, what remains inaccessible and how newly discovered suspect material will be handled.
Coordinate layout, structure and major systems together
Bring the desired layout and proposed equipment into the same review. Ask the team to explain where structure, plumbing, electrical work, ventilation and heating or cooling need coordination. Focus on the decisions those reviews require from you: room dimensions, appliance models, ceiling appearance, storage priorities and access for future maintenance.

The City’s alteration and addition submittal checklist addresses existing and proposed plans and relevant structural and service information. Which documents apply depends on the project. An opening that changes structure needs project-specific evaluation; its appearance in a reference photo does not establish whether the same detail works in your house.
Keep a list of coordination questions next to the plans. Will the proposed opening change the ceiling profile? Does the chosen appliance fit both its opening and planned connections? Have lighting locations been considered alongside cabinetry and ventilation? Who updates every affected drawing when one decision changes?
For a hypothetical example, an owner changes the cooking appliance after approving cabinetry. The team now needs to check the new manufacturer’s dimensions, connection requirements and installation instructions, along with the ventilation design. A change that began as a shopping preference may require revised cabinetry and trade coordination. The answer is to review the complete change before approving the replacement order.
For covered applications submitted on or after January 1, 2026, California’s 2025 Energy Code applies. The requirements depend on the project and affected work. Ask the design team to identify the relevant alteration requirements; do not assume that a whole-home renovation automatically requires replacing every existing system.
If an electrical-service change is proposed, assign responsibility for utility coordination. For LADWP customers, its construction and renovation service request process covers upgrades, relocations and other service changes. Confirm the provider for your address and track its requirements separately from the building permit.
When the room arrangement is still evolving, architectural planning is a useful starting point for the conversation about coordinated scope and drawings.
Confirm permissions, responsibilities and daily logistics
Confirm the building and planning jurisdiction for the property before setting a demolition date. The City of Los Angeles construction process includes necessary reviews, clearances and permit issuance before covered construction. Unincorporated communities and some contract cities use Los Angeles County Building and Safety; other cities have their own arrangements. A Los Angeles mailing address is not enough to settle the responsible authority.
Ask who obtains each required approval, who receives corrections, and who confirms that the actual proposed work matches the authorized scope. Put those responsibilities in writing. “Permit submitted” and “ready to start” describe different states; request the evidence appropriate to the work being released.
Then walk through the site logistics with the contractor. Discuss delivery access, debris removal, material storage, protection of retained areas, security and weather exposure. Identify where vehicles and containers can actually go and who checks any permissions needed for their proposed locations. A plan that depends on borrowing a neighbor’s driveway needs that issue resolved before deliveries begin.
Make living arrangements part of the same discussion. Keeping one bathroom usable does not answer every question about safe occupancy. Ask the contractor to explain work boundaries, access routes, utility interruptions and the conditions under which the household must be elsewhere. Consider children, pets, remote work and anyone who depends on reliable access or equipment.
Separate the hoped-for return date from the conditions that must exist before returning. Discuss what would trigger an extension of temporary housing and who provides notice. Include the household’s relocation and storage costs in your own planning rather than assuming they are part of the construction proposal.
For contractor selection, CSLB recommends checking license status, references and written project responsibilities in its homeowner checklists. Keep your verification and project documents together so everyone is working from the same current information.
Create a materials watchlist tied to construction decisions
“Order early” is incomplete advice. First confirm what is being ordered, whether the drawings and related selections agree, and when the contractor needs it. Then obtain a supplier’s current availability information and assign responsibility for following up.
Use a watchlist for products with important dimensions, installation dependencies or uncertain supply. Include owner-purchased items. Record the exact model or approved specification, who confirms dimensions, the required-on-site date, supplier confirmation, order responsibility, substitution rules and storage plan. Mark a quoted lead time as an estimate until the supplier provides the relevant order confirmation.
| Product or system | Confirm before ordering | Dependent work | Record to keep |
|---|---|---|---|
| Kitchen appliances | Model, dimensions, connection and installation requirements | Cabinet details and coordinated trade work | Approved product data and order acknowledgment |
| Windows and exterior doors | Approved specification, dimensions and opening coordination | Opening preparation and enclosure work | Reviewed order, delivery confirmation and protection plan |
| Plumbing fixtures | Compatible components and approved locations | Rough plumbing and finish installation | Coordinated selection list and parts confirmation |
| Flooring | Selected product, room boundaries and adjoining transitions | Substrate preparation and finish sequence | Approved sample, quantities and manufacturer instructions |
A substitution should go through the same coordination check as the original choice. Similar appearance does not confirm compatible dimensions or installation requirements. Ask who must approve it and whether drawings, quantities, pricing or the schedule change.
Also assign delivery inspection. Identify who checks that the correct items arrived, who records visible damage or missing components, and who follows up with the supplier. An unopened box on site should not silently become proof that the next installation is ready.
Review the watchlist at project meetings, with priority given to the next dependent work. This keeps attention on decisions that affect progress while giving genuinely later choices a clear place in the schedule.
Agree how concealed conditions and changes will be authorized
Even a well-planned renovation may reveal conditions that were inaccessible before opening. Prepare for that possibility by agreeing on the communication and authorization process. A contingency amount alone does not explain who investigates, who approves a response or what happens to other work.
Ask the contractor to distinguish an identified allowance from a reserve for unknown conditions. Clarify what each allowance includes and how its final cost is reconciled. Keep owner-requested upgrades separate from discoveries so the reason for every proposed change remains understandable.
When a condition is found, request a record of the location, observation, affected work and next assessment. The appropriate professionals should decide what protection or pause is needed. The owner’s role is to understand the proposed response and its consequences, not to diagnose a structural or hazardous-material issue from a photograph.
For California home-improvement contracts, CSLB states that changes to price or scope require a written change order signed by the customer and contractor before the change. See its contract guidance. Also ask the project team to explain scheduling and document updates before deciding.
A hypothetical concealed-condition record
Suppose authorized opening reveals a concealed pipe route that conflicts with the planned cabinetry. A useful discussion record would include the following. This is an example for organizing information, not completed contract language or a technical remedy.
- Observation: Identify the room and location, attach photographs and reference the affected drawing.
- Assessment: Name the qualified person reviewing the condition and state what still needs confirmation.
- Options: Describe the feasible responses supplied by the project team, including any design or permit implications.
- Price: State additions, credits and exclusions so the net adjustment is clear.
- Schedule: Identify affected activities, information still pending and any confirmed revised dates.
- Authorization: Record the required written approval and distribute the updated instructions before the changed work proceeds.
Ask whether unaffected work can continue and who makes that sequencing decision. Close the record only after the agreed response has reached the drawings, orders and schedule that need it. Otherwise, a signed decision can coexist with obsolete instructions in the field.
Use a readiness review and a decision calendar before demolition
Schedule a focused review of the proposed start. Bring the latest scope, drawings, permit information, investigation records and materials watchlist. Ask each responsible person to state what is confirmed, what remains open and which work that open item affects.
Use four progress labels: confirmed, needs investigation, open decision, or not applicable. Every item that is not confirmed needs a next action and a named responsible person. If something is not applicable, record why. A blank box should not be interpreted as agreement.
| Item | Decision or evidence | What may hold the start |
|---|---|---|
| Scope and retained elements | Current plans and agreed room schedule | Conflicting instructions about removals or preservation |
| Required permissions | Applicable approvals and assigned responsibilities | Proposed work is not yet authorized |
| Existing conditions | Available assessments and an authorized investigation plan | A critical unknown has no agreed assessment or stopping point |
| Protection and logistics | Contractor’s access, protection, utility and household arrangements | Required arrangements are unresolved |
| Selections and deliveries | Specifications needed for the next activities and supplier confirmations | Unresolved choices undermine the planned sequence |
| Changes | Agreed reporting and written authorization process | No clear route for approving discoveries or revised scope |
This review organizes the discussion; it does not issue permits, approve safety conditions or replace the contractor’s responsibility for the work. Avoid reducing it to a score. Five completed categories do not cancel out a sixth that prevents the affected activity from starting.
Build the decision calendar backward from dependent work
For each open choice, write the dependent activity first. Then ask what information the decision needs, who approves it, and when that approval must reach the person ordering or building. The contractor should connect those dates to the actual project schedule.
For example, a cabinet decision may depend on verified room dimensions, appliance data and the approved layout. Its calendar entry should identify the approval deadline before fabrication, supplier-confirmed delivery information and the effect of a late change. Do not assign a convenient date without checking those dependencies.
| Decision | Before this work | Information and approval | Calendar entry |
|---|---|---|---|
| Retained flooring boundary | Removal in adjoining rooms | Owner’s priorities, marked plan and contractor’s protection approach | Record agreement before the affected removal is released |
| Appliance selection | Dependent cabinet fabrication and trade work | Manufacturer data, coordinated drawings and named owner approval | Confirm decision deadline, supplier date and late-change consequences |
| Concealed-condition response | Affected repair or installation | Professional assessment, options, pricing and required authorization | Identify the hold point and revise affected activity dates |
If more than one household member approves selections, agree who communicates the final decision. Discuss preferences together before that person releases instructions to the project team. Record the approved version in one shared place; a text message, an old sample and a revised drawing should not compete as three different answers.
At each meeting, review overdue decisions first, then choices needed for the next planned activities. End with a short list of assignments: the question, responsible person, information needed and response date. If someone cannot meet the date, ask the contractor to explain the effect on dependent work and update the plan. Treat that conversation as schedule coordination, not as an informal promise that everything will still finish on the original date.
The renovation readiness worksheet (fillable PDF) brings the review, decision calendar, materials watchlist and discovery record together. Fill in the fields for your project, then print or save the completed worksheet before closing it. Use the next-action column to turn unresolved items into specific assignments for the next meeting.
Download the fillable PDF and open it in a PDF reader that supports forms. Save a copy after entering your information.
Keep the decisions coordinated after demolition
The first review after authorized opening should compare the exposed conditions with the assumptions used to plan the job. Ask what matched, what changed and what needs professional assessment. Carry any approved response through the drawings and schedule before the affected installation continues.
Then review the next set of dependencies. Are equipment specifications coordinated? Have relevant dimensions been confirmed? Are the required components available? Has each trade received the same current information? A short review of these questions is more useful than treating every open issue as equally urgent.
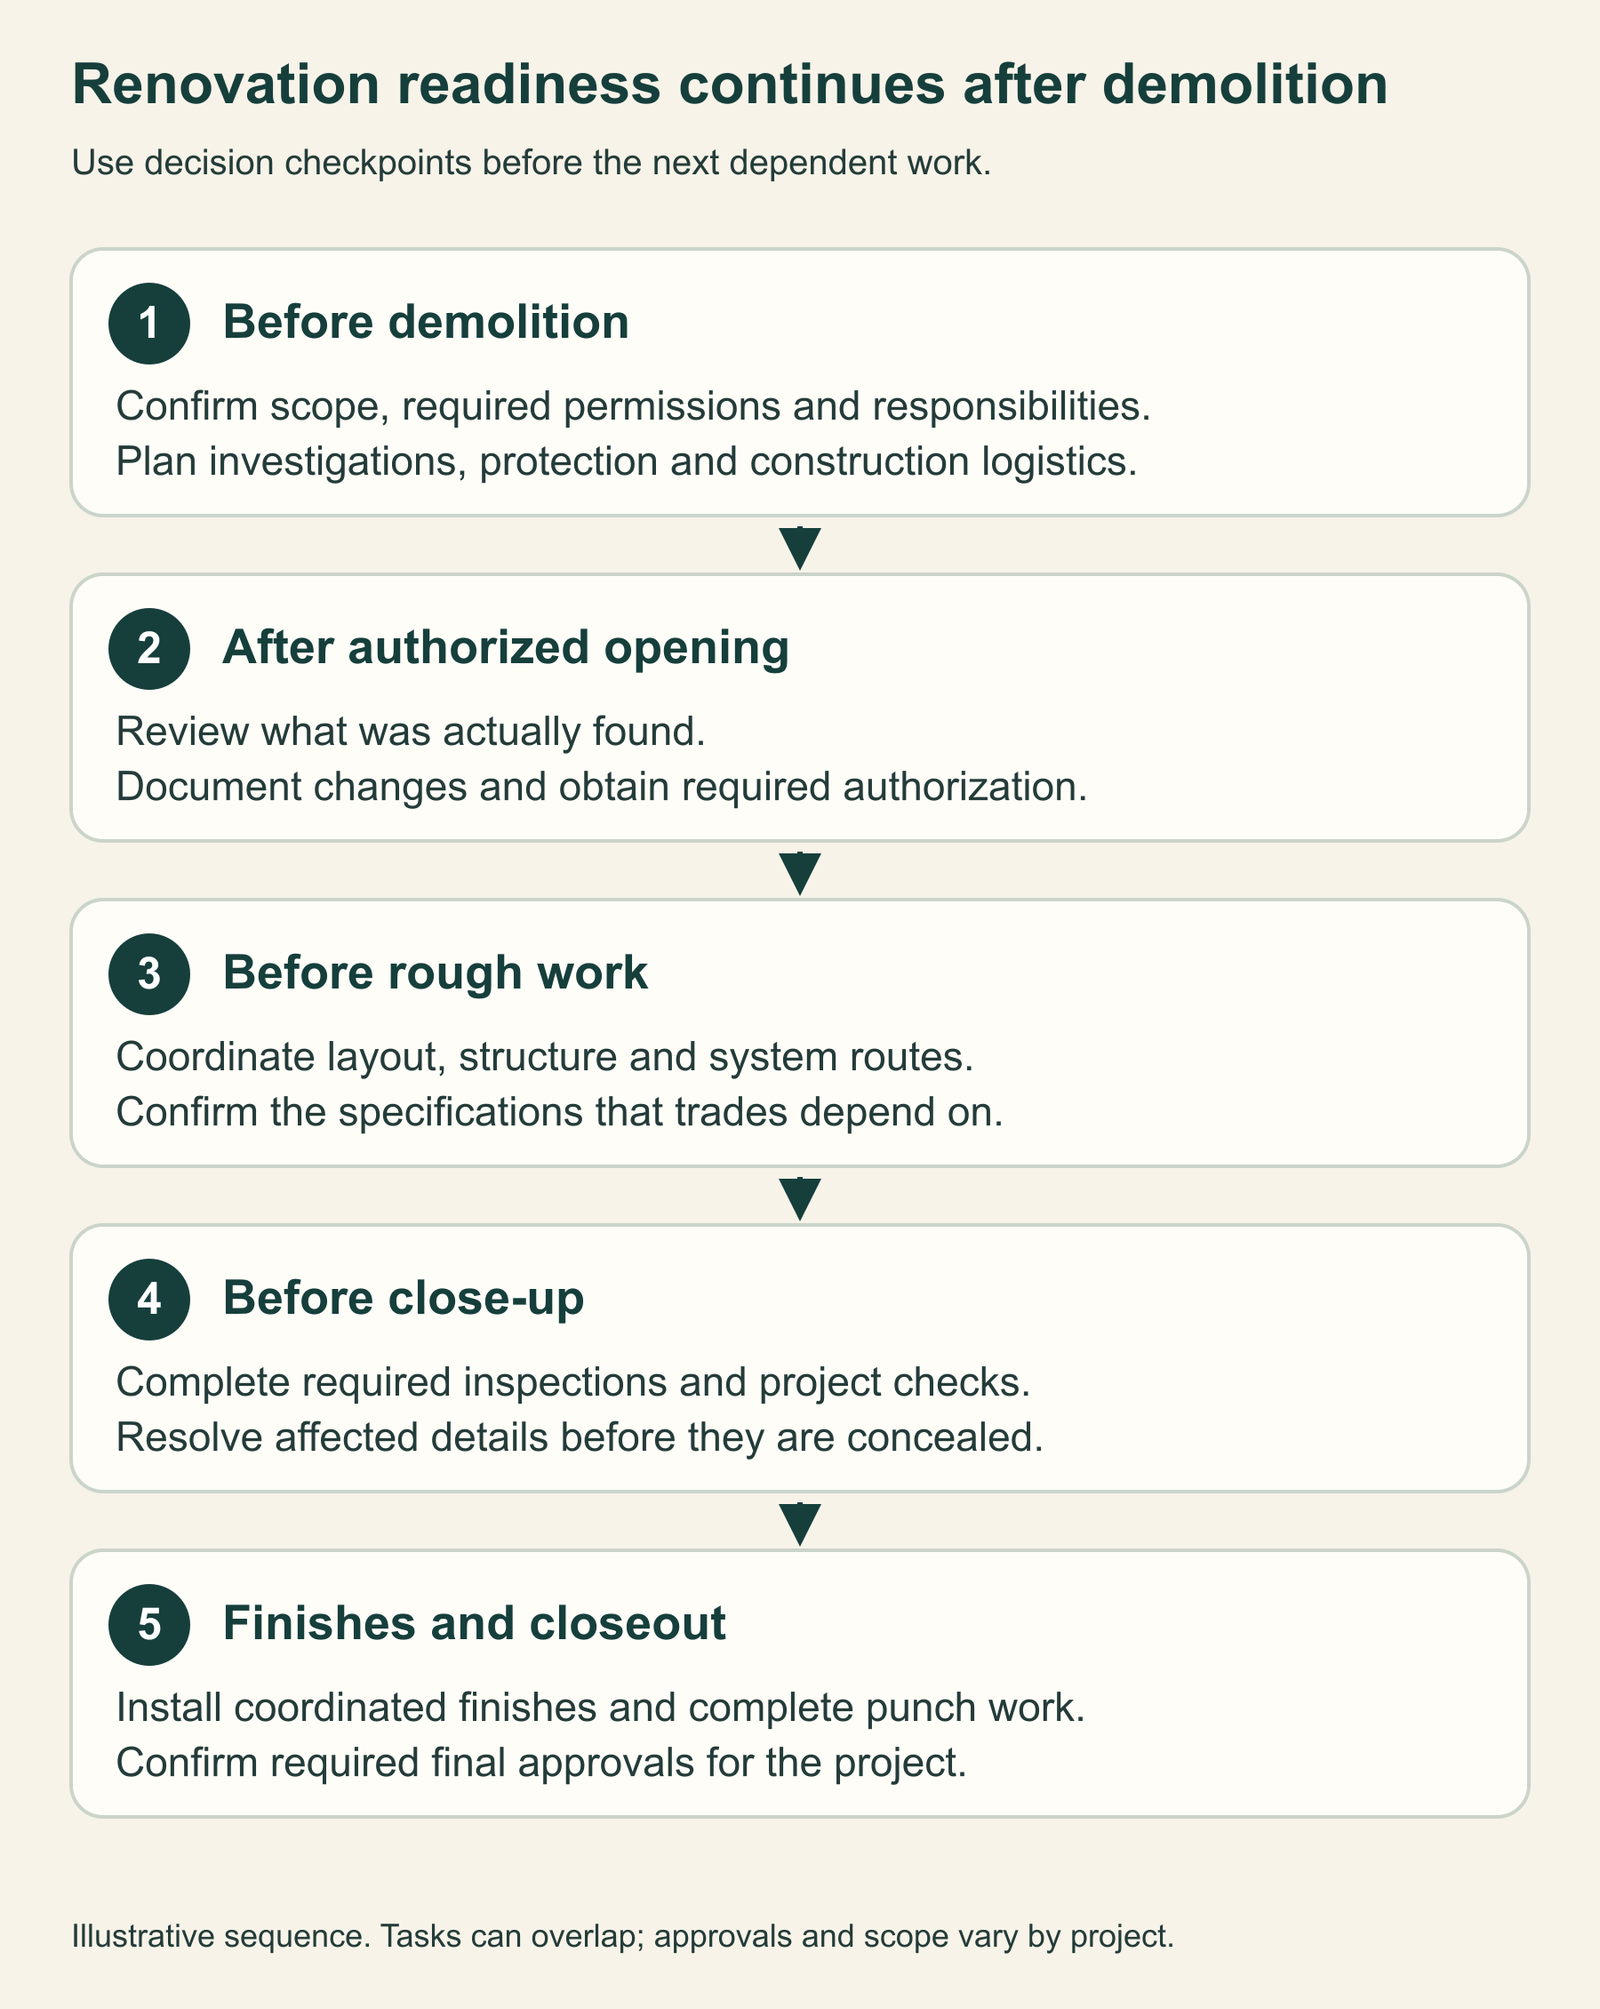
Before walls or other assemblies close, confirm the required inspections and project checks. LADBS explains that work subject to inspection must remain accessible and visible until the relevant approval; photographs do not replace that inspection. Use the project’s actual inspection requirements rather than a generic list. See LADBS inspection guidance.
Ask the contractor how owner observations are collected before finishes conceal areas of interest. Keep a dated drawing set and organized photographs where appropriate, while recognizing that documentation is different from approval. Resolve discrepancies through the responsible designer, contractor or inspector.
At closeout, separate the remaining finish list from required final approvals. For City projects, LADBS’s step-by-step guidance addresses final inspection and occupancy documentation where applicable. A new Certificate of Occupancy is not a universal requirement for every renovation.
Request the agreed handover documents, such as final records, product information, warranties and care instructions. Identify who follows up on each remaining item and when. The same habit that helped before demolition—an accountable person and clear evidence of completion—also makes the end of the project easier to manage.
Prepare for a useful whole-home renovation conversation
Bring your property city and address, photographs of current conditions, available plans, a room-by-room wish list and the priorities that matter most. Include your budget expectations and target timing, along with any fixed household commitments. Explain which dates are preferences and which involve obligations you cannot easily change.
It is reasonable to arrive with unresolved choices. Make them visible. A productive early discussion should help identify what requires design, investigation, pricing or agency confirmation before a dependable scope can be established.
Review RCP’s Los Angeles remodeling services, or discuss your project with Remodeling Contractor Pro. RCP prioritizes substantial projects in Los Angeles and the surrounding service area within 50 miles; confirm the specific address when you inquire. Its inquiry qualification threshold is a project budget of at least $10,000. That threshold is not a whole-home renovation estimate or a promise that the proposed scope can be completed for that amount.